I love smoked brisket and so does my family! It is always my son’s number one birthday dinner request. We always go and get it from our local barbeque joint on his birthday. I use my pellet grill nearly every day, no exaggeration, and I feel like I am a confident barbeque-r. So, I decided it was time to take on my first smoked beef brisket! Further solidifying the idea, was the fact that I found it on sale for Easter and I knew it was time! I loaded up my cart with a massive hunk of meat and committed at that moment to a process that would take me a full 24 hours to complete. A decision I have no regrets about taking on.
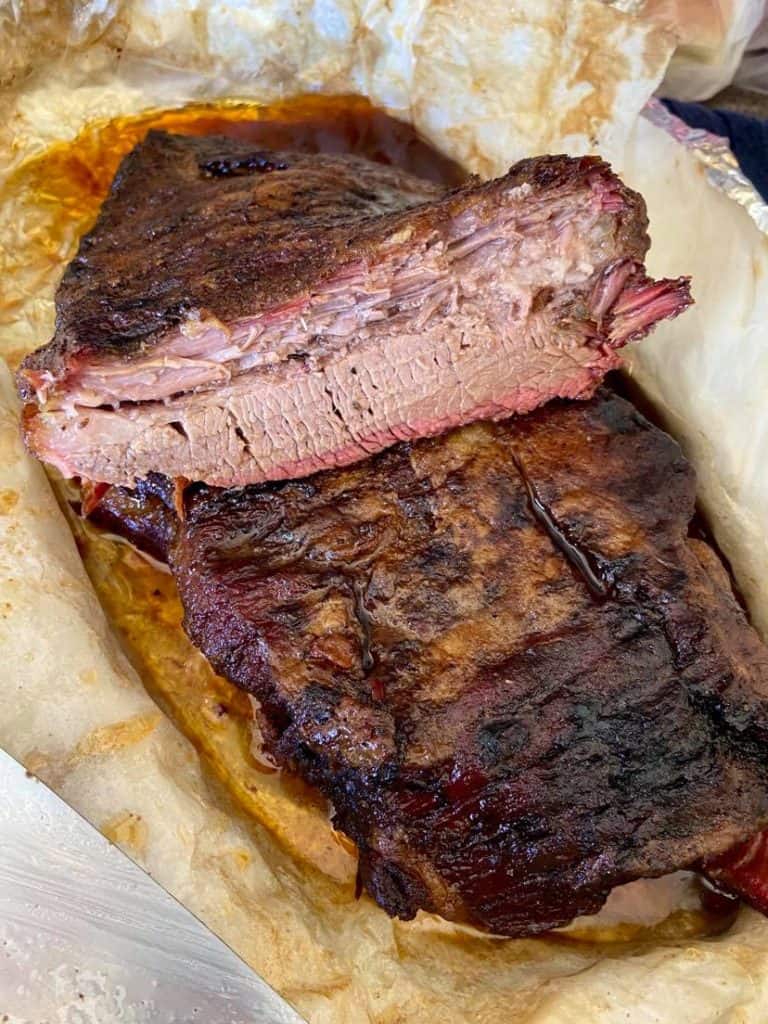
I really wanted to see how my own smoked brisket stacked up against the professional barbeque joint’s brisket that is so beloved by my family. The results were better than I could have imagined. We took a family poll and had everyone vote which one they liked better, the restaurant or mine. Just for reference, my kids are brutally honest with food reviews, after all their mom is a self taught chef that tests recipes on them daily. I would describe them as meat snobs because they know when meat is cooked properly and seasoned right. A fact I both love and hate at the same time.
At any rate, my kids are straight shooters when it comes to food reviews and they take a comparison vote very seriously. They unanimous vote was that my smoked brisket was better in the categories of flavor, tenderness and juiciness. I almost feel like I need a certificate with all of their signatures on it to keep on hand. ha ha! I know my kids will probably taste another barbeque place’s brisket someday and be like “hmmm this may compare with mom’s” and it’s then when I’ll pull out that little certificate and remind them of how good this first brisket was. ha ha! Although, I am hoping to make many more so their memories won’t get too dusty.
So, did I just get lucky? Yes and no. YES, because I think there is always a small element of luck in cooking, baking and barbeque, anyone who tells you otherwise is messing with you because sometimes things are good and sometimes things are beyond great, it’s just how it works.
Also, the answer is a huge NO because I do believe in technique strongly so I enlisted some help from a fellow Instagram foodie friend who rocks it at barbeque. He knows his stuff and he was generous enough to give me steps to take and tricks to make my first brisket a great one! He has years of experience under his belt and I felt so fortunate to have him share with me a fraction of his knowledge. If you want to see his Instagram page, which I would highly recommend you do and give him a follow, he doesn’t have a website yet but if he did I send you his way, however, his Instagram is https://www.instagram.com/fatboysbbq_pdx/ .
I obviously still made mistakes in this first round of brisket making, I think mistakes are what make great chefs, bakers, and barbeque-rs. Heaven knows I have made too many mistakes to count in my cooking journey of over 25 years! I’ve been cooking, learning and trying something new every day and learning everyday too, I anticipate I’ll do so until the day I can no longer be in the kitchen. On the flip side of that, if you ever feel like you’ve hit perfection, shake yourself, you’re probably missing something, in my opinion. Mistakes are a good thing, makes us human and means we are learning. In light of making mistakes, progressing and learning through them I am going to tell you what I did wrong in this smoked brisket process, as well as what I did right and the lessons I learned. Here we go!
Step One:
Trim your brisket
Brisket is FATTY, one of the reasons it’s so darn good and tender. However, you don’t want too much fat on your brisket when you are going to smoke it. I’m not advanced enough in brisket cook-ology to tell you the nitty gritty details about why you want to trim your brisket, but just that fact, that you do want to trim it, it will smoke better and end up more tender. That knowledge is good enough for me so I trimmed away. I left a little fat on my brisket but ended up trimming about 2 pounds of fat off. wowzers right?!?
I also noticed a blood vessel that ran through and out the top corner of the brisket, I am not a lover of finding blood vessels in my meats so I sliced that vessel and pressed gently on it to remove some excess blood that was in it. That way you don’t hit it when you cut into it later and get an unappetizing blood vessel. I don’t know if all briskets will have a blood vessel with blood still in it but mine did so I figured I would mention it here.
Step Two:
Dry brine over night
You should coat your brisket in a healthy dose of good seasoning the night before you smoke and keep it in the refrigerator. This will help tenderize and make your brisket more flavorful. Seasonings and rubs differ, however, for my brisket I decided to coat my brisket in pink sea salt (be generous, beef can handle it), fresh ground peppercorn medley, granulated garlic powder, paprika (it gives it a subtle sweetness, just trust me on that one) and then I finished it off with umami seasoning from Trader Joes, you could add your favorite seasoning rub in its place.
Step Three:
Relax those proteins
Bring brisket to room temperature before adding to the smoker. This is a meat and proteins 101 concept, when the protein fibers of a meat are rested and room temperature they remain more tender in the cooking process. Now I could get more technical on this subject because I refer to it a lot with cooking, baking (hello rested egg whites, I see you) and even whipping up some whipped cream. Cold equals tightly bundled proteins, warmer, equals more relaxed proteins.
Step Four:
Start your cook
Turn on your pellet grill or fire up your smoker and get to 225 F.. Place the bare seasoned and rested brisket on the grill or smoker fat cap side down. Shut the grill and walk away. Let it cook for 4 hours, no peek-a-boo moments until this point.
Step Five:
Check the internal temperature
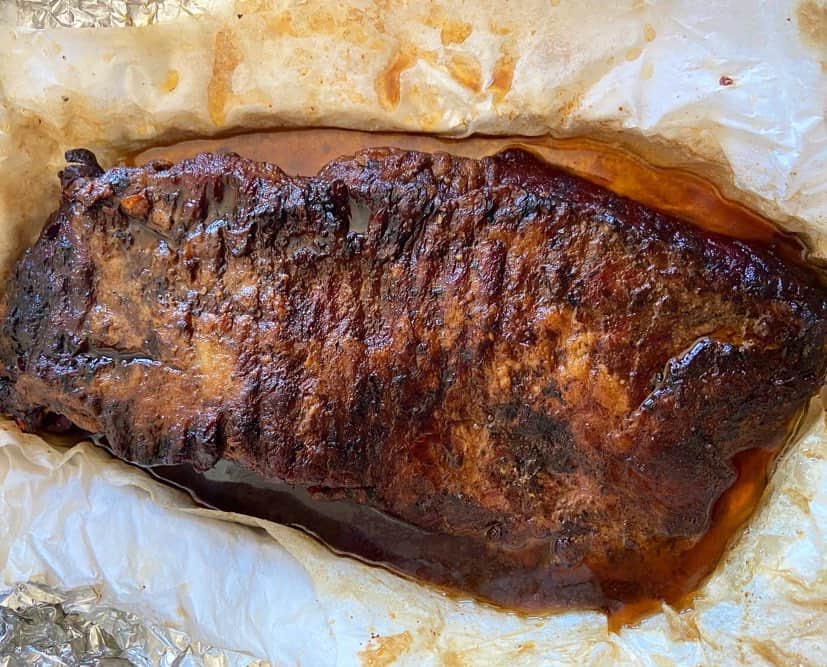
At this point we are going to check on our beauty. There should be a nice crust or bark as they call it in the barbeque world on the outside. It will be a beautiful reddish, brown color and feel firm. Once it looks like this, insert a temperature gauge and see what the internal temperature is. You want it to be close to 200 F.. Mine was at 190ish and I decided it was time to go to phase two, You can let it sit a little longer until it hits 200 F. because that was the advice I was given, however, mine seemed to be okay at 190 F.
Step Six:
Slather the brisket
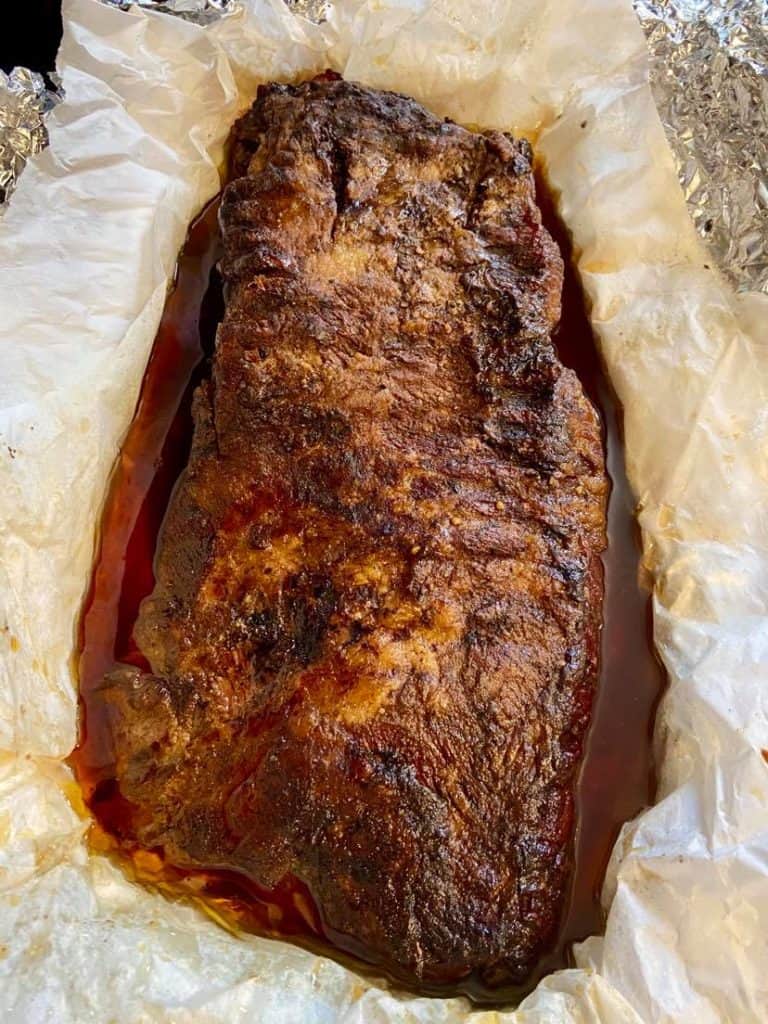
Take the brisket off the grill and place parchment paper beneath the brisket then coat it in beef tallow. You heard me right, beef tallow that brisket up! The tallow will instantly turn to liquid when it hits the brisket but give that baby a bath in it, trust me, just like I trusted my barbecuing genius friend. I used about 6 ounces of tallow or half a jar.
Step Seven:
Wrap that brisket up
Continue to wrap your beef tallowed brisket in butcher paper, I didn’t have butcher paper so I utilized parchment paper which seemed to do the trick too. Here is where I made my first departure from my amazing barbequing friend’s advice, I decided to also add a layer of aluminum foil around the parchment paper to keep all the tallow and brisket juices locked inside. This was both good and bad, good because It did keep the juices inside but bad because it softened my crust or bark on the outside of the brisket. My friend helped me to know that this could be fixed by doing a reverse sear, re-hardening of the brisket, a hail Mary of sorts, at the end of the resting process, so that is what I did, but I will get to that in step ten.
Step Eight:
Hot Knife through butter stage
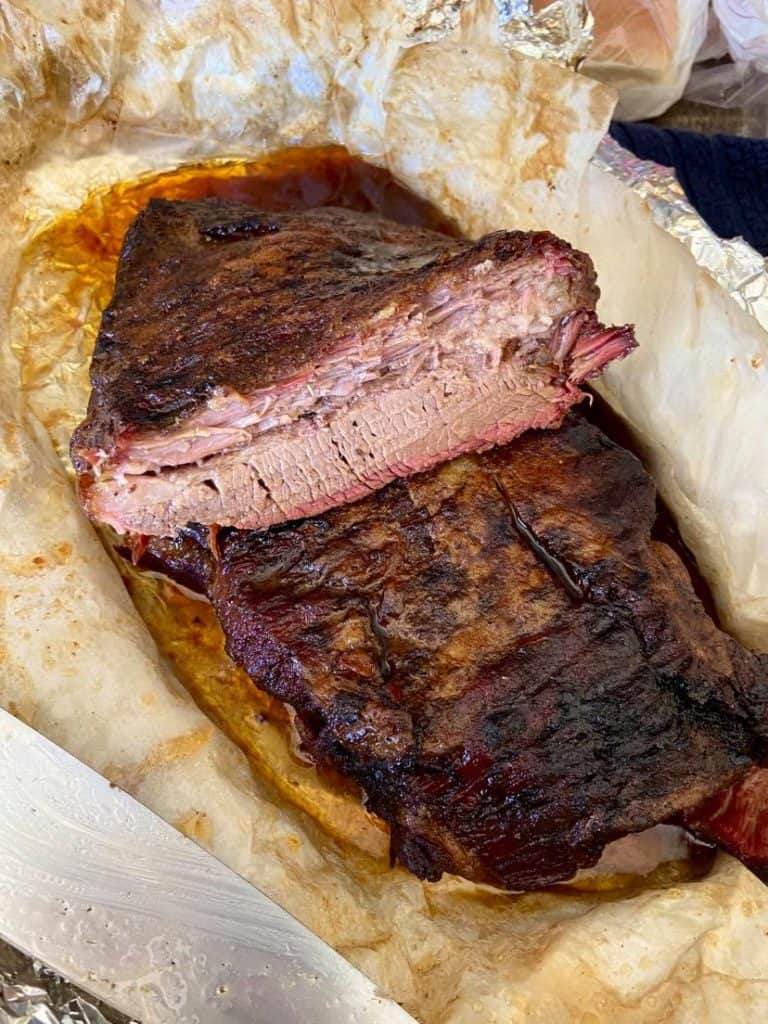
Continue cooking your smoked brisket until your thermometer or a probe can slide through your brisket like a hot knife through butter. My friend’s exact words, which I couldn’t describe it any better than that, it literally feels like running a hot knife through butter. My brisket hit this point about 2 hours before I was planning on it getting there. Which brings me to my next point, think ahead because I didn’t, my brisket took 11ish hours to cook and another 12-13 hours to rest then add a reverse sear at the end and it was a full 24-25 hour process before we ate.
So prepare yourself for that and I will walk you through how to get away with a long rest time because trust me I learned that the rest time is huge in getting a tender and juicy smoked brisket. Place the brisket on a cookie sheet at this point because it will be a little hard to handle.
Step Nine:
The rest
I was given the advice to open the butcher paper and let the brisket sit for 10 minutes on the counter, this helps establish the bark, (the part I over softened when I added the layer of aluminum foil, I’m not fully convinced that was a bad thing but I know it wasn’t the best thing for the bark). After the 10 minutes, rewrap the brisket by closing up the butcher paper and if using aluminum foil like me, again, just to be clear, the aluminum foil it will soften the bark but keep the extra juices in. Wrap the wrapped brisket in towels and rest for 5-13 hours, My friend told me some bbq places do a 20 hour rest, so however long you can keep it warm, the longer the better.
Here is where I failed at the timing part, I finished cooking my brisket earlier than I expected which ended up being 10 pm, I didn’t want to eat my brisket until lunch the next day and a 10 hour rest would land me right at 8 am. While I am down for smoked brisket at any hour of the day, my family isn’t quite so jazzed about breakfast brisket. So, I was given the advice to place my brisket in a warm oven of 170 F. to extend the resting time. so I removed the towel for obvious reasons and placed the parchment and aluminum foil wrapped brisket into the oven where I let it rest at 170 F. until 12:30 am when I went to bed.
I am overly cautious when it comes to leaving my oven on over night, blame it on the time I almost burned my first house down while making onion rings for my husband because I forgot the hot oil on the stove, that experience scared and scarred me a little. So I shut the oven off and went to bed. I woke up at 6:30 am to turn the oven back on to 170 F. then went back to sleep and then let it rest until 11:30 am.
Step Ten:
Fixing my smoked brisket’s bark
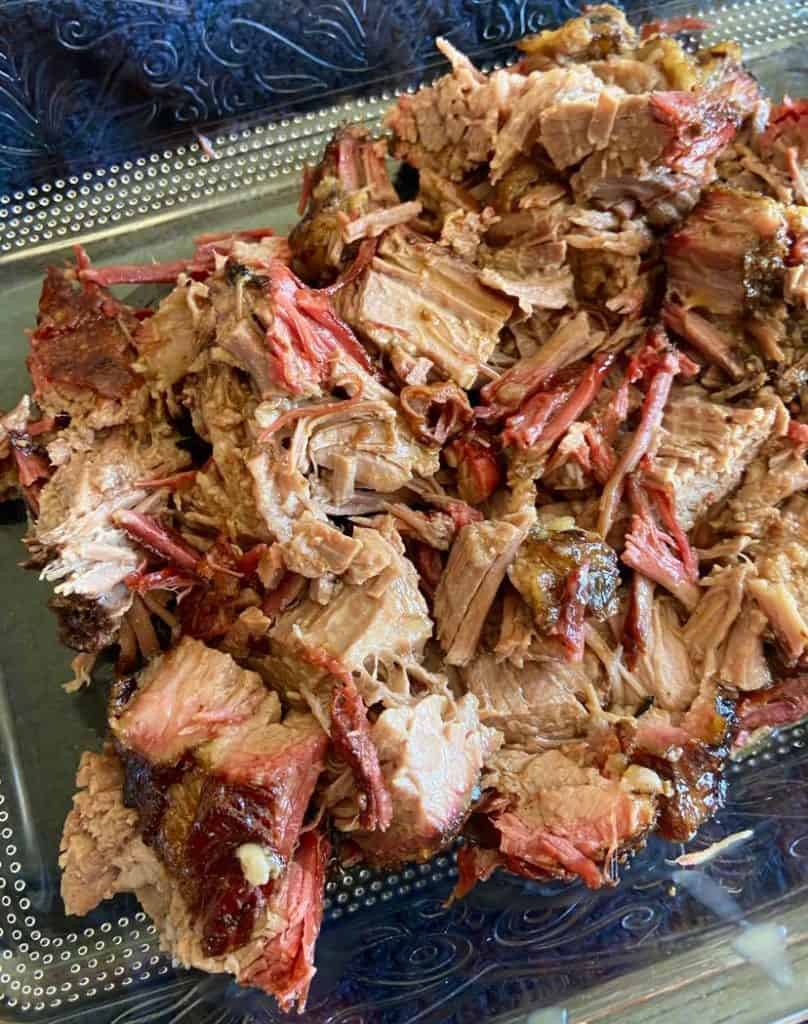
I turned my pellet grill to as high as it could go, 550 F. for mine. I opened the wraps up and exposed the smoked brisket. I spooned over some of the tallow and juices on top and cooked for about 15-20 minutes; so the bark could firm back up. It worked great, I could have left it on for longer to get an even better looking bark. However, I felt it was good enough for me and we were ready for lunch. I let it rest for 10 minutes, while we set the table and got dinner ready. My kids love their brisket chopped. so that’s how I cut it. I spooned on a little more of the tallow/brisket juices on top and we enjoyed.
I saved some brisket for leftovers and ended up freezing 4 other bags of smoked brisket. Which means, I won’t have to do another 24 hour smoke again for at least a month; if we eat it once a week. Overall, it was a painless and fun experience and the outcome was completely and unanimously voted, delicious! There is something so fun and addictive about barbeque and it always keeps me coming back for more. I often say that barbecue is similar to baking in that it’s technical, takes a little luck, a lot of patience and you learn something new from it each time you do it. I hope this post will help anyone who’s looking to make a fierce beef brisket! Thanks for reading and thanks to those who live and breathe barbeque who are willing to share their experience and expertise.
Here is a quick reference list of things you need to make smoked brisket:
- Brisket – obviously
- Sharp knife to trim the fat with – also fat is easier to trim when it’s cold
- Seasonings:
- Salt (don’t be timid)
- Black pepper
- Your favorite seasoning or BBQ blend
- Garlic powder – optional
- Paprika – optional, adds sweetness
- Butcher paper
- Aluminum foil – this one’s a little iffy, may ruin the bark but will keep the brisket juicy.
- Beef Tallow – I used half a jar
- Meat thermometer or grill temperature probe
- Towels
- A low heat setting for an oven or a really well insulated cooler
What wood to use?
I used a Traeger blend called Big Game Wood Pellets. That blend consists of hickory, red and white oak with rosemary oil infused into the pellets.
I would suggest any stronger smoke pellets or wood. Depending on your smoker or pellet grill, woods like oaks, mesquite, hickory or pecan.
Here are a few other BBQ recipes you may love:
Black Cherry and Molasses BBQ Sauce
Grilled Maple Butter Salmon
Apricot Grilled Pork Tenderloin
Dukkah Grilled Eggplant
Quick Smoked Tri Tip
Pellet Grilled Sheet Pan Salsa
Smoker Lemon Pepper Chicken
Smoked Prime Rib
Whole Smoked Chicken
Smoked Turkey Compound Butter
Many more recipes can be found under search words, “grilled” or “smoked”
Smoked Brisket
Ingredients
- Brisket 7-10+ pounds
- Sharp knife to trim the fat with Fat is easier to trim when it's cold
- Seasonings:
- Salt Don't be timid, beef can take it
- Black Pepper
- Favorite BBQ spice blend or rub
- garlic powder optional
- paprika optional, adds a little sweetness
- Butcher paper
- Aluminum foil – this one is optional may ruin your bark but will keep the brisket juicy.
- Beef Tallow – I used half a jar or about 6 ounces
- Meat thermometer or grill temperature probe
- Towels to wrap brisket in while resting
- A low heat setting for an oven or a really well insulated cooler for resting
Instructions
- See associated recipe post for in depth steps and tricks for cooking. Summarized steps below.
- Trim your brisket – trim excess fat, keeping some on.
- Dry brine over night – season and brine over night in the refrigerator.
- Relax the proteins – bring meat to room temp before cooking.
- Start your cook – fat cap side down, 225 F.
- Check the internal temperature – between 190 F and 200 F. internal temperature.
- Slather the brisket – in beef tallow.
- Wrap the brisket up – wrap in butcher paper or parchment paper if butcher paper can't be found, optional to also wrap in aluminum foil.
- Hot Knife through butter stage – check for your thermometer or probe to slide through your brisket like a hot knife through butter would.
- The rest – wrap in a towel and rest for 5-10 hours or keep covered in a low temperature oven 170 F. or below for 5-13 hours.
- Reestablish your briskets bark – heat pellet grill or smoker to 550 F. and cook brisket uncovered for 15-20 minutes to harden up the bark again.
- Rest for 10 minutes, slice and enjoy.
*As an Amazon associate I may receive commission on featured items